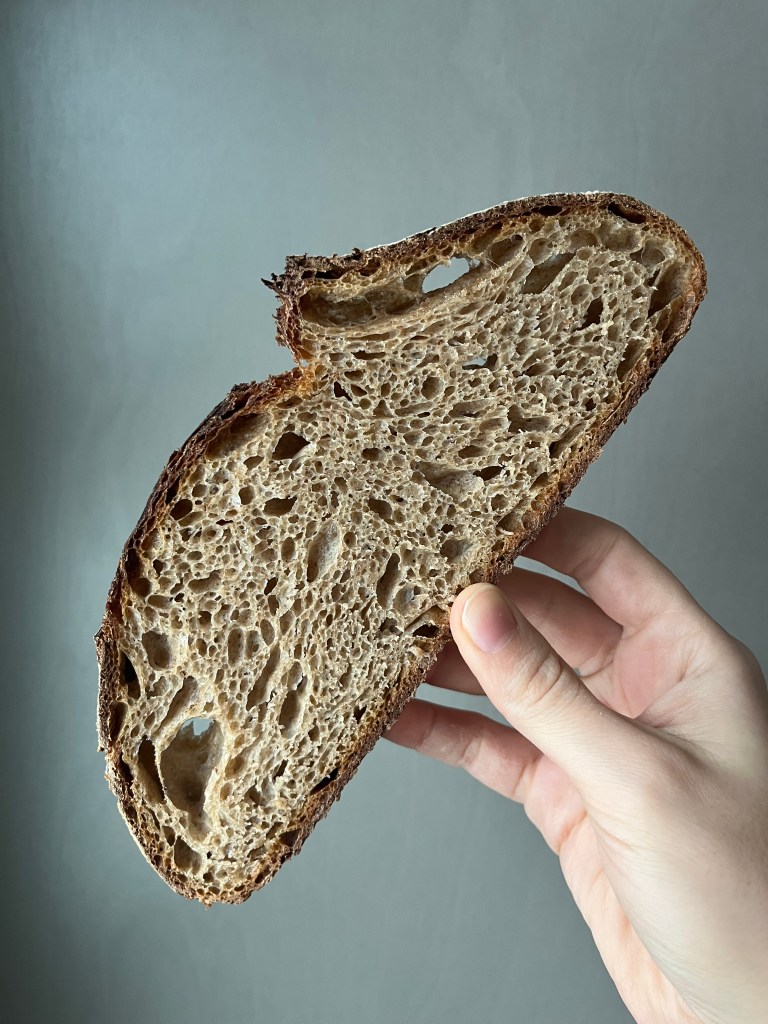
I’ve been wanting to make a 100% whole wheat bread because I love the intense flavor. I think it really suits the cold wintery days we’ve been having. However, 100% whole wheat bread has a tendency to be… flat and yucky. When the hard shell of the wheat berry, called bran, is ground up to become flour it exposes its sharp edges, which literally cut the gluten strands and stops the structure of the bread from forming. This is why bread with a higher proportion of whole wheat flour tends to not rise as high and takes longer to proof.
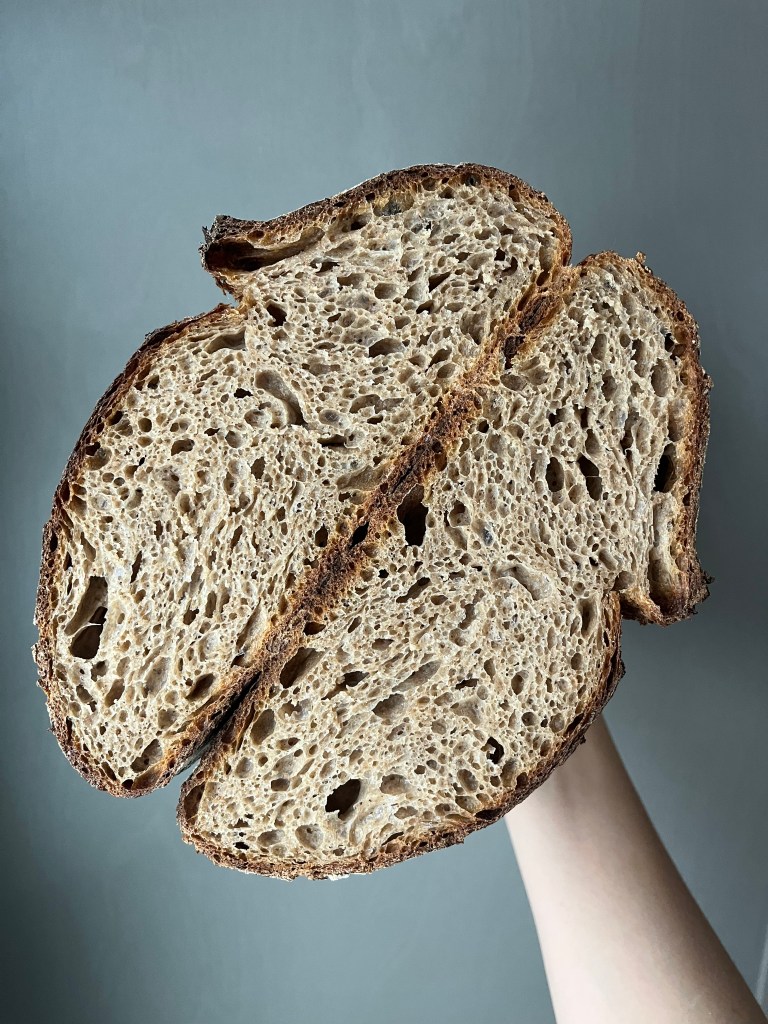
I thought that maybe combining multiple types of whole grains might help with this problem. I’ve been experimenting a lot with spelt recently, which is an ancient species of wheat that has a nutty flavor and a higher protein content. For my experiment I did about 40% spelt and 60% whole wheat flour, and it turned out amazing! And it actually rose!

I start almost every bake with the same starter. I always do 10g starter, 100g water, 50g white flour, and 50g whole wheat flour. Then I scale it up for whatever I need. For this recipe I needed 300g of starter, so I used 20g starter, 200g water, 100g while flour, and 100g whole wheat flour. This gave me 420 grams of starter to work with. I try not to overcomplicate it by making exactly the amount of starter I need and instead make a little extra. Then I have some to feed the next day too.
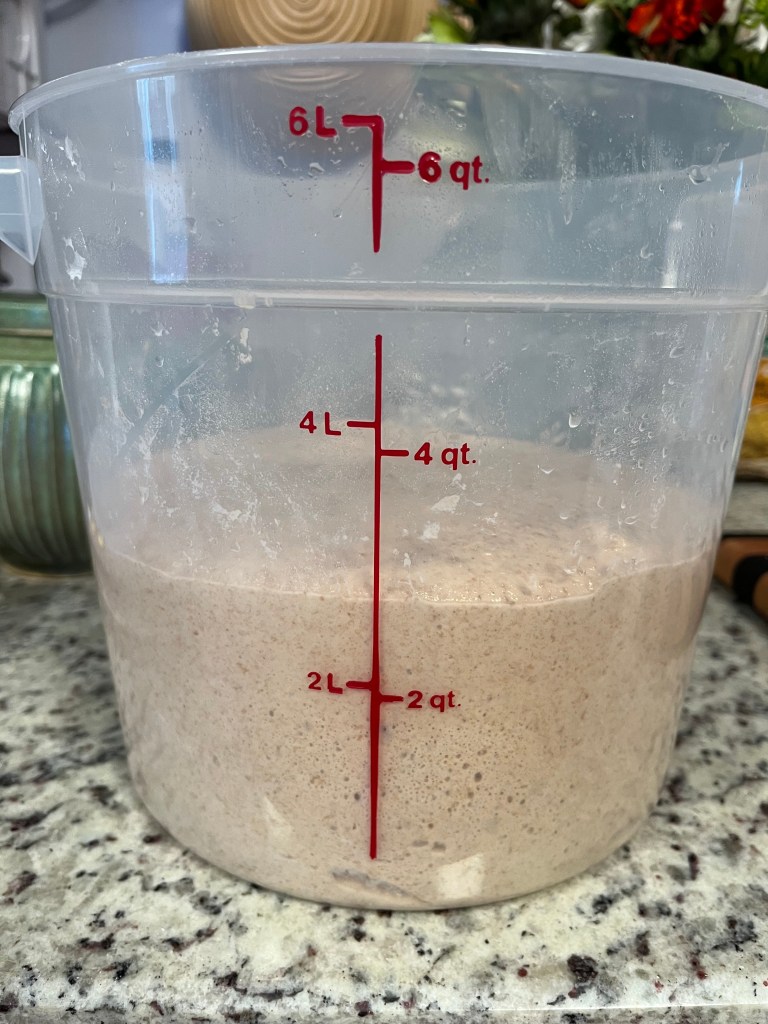
I fed the starter around 8am and mixed the final dough around 6pm when my starter was looking bubbly and puffy. It needed 4 folds, which were very satisfying, and ultimately I left it to proof overnight on the counter. To be totally honest, it’s pretty cool here at night (around 65F in the kitchen), so I wasn’t worried about it going too far. I might make different choices in the summer… we’ll see.
It rose a lot overnight, probably doubling in size. There were strong bubbles around the top edge of my container, but it was clearly not deflated or saggy. These were all signs to me that it was ready to be shaped.
Recently I’ve been using the “spiral” technique for shaping, where you essentially spin the bread slowly in a spiral (like winding a spring) creating tension on the top by tucking the top layer of dough underneath as you swirl it. This is great for a round dough, but doesn’t really work for oblong shaped. An oblong spring seems less than ideal. Instead, I used an old classic. Dump the dough onto a surface, wrap the top most part, stretch it up into the air and down towards the bottom. Then do the same with the bottom and both sides, always stretching the dough down to the opposite side. This should give you a tight little package. Next, grab the dough closest to you with your thumbs on the bottom and your other fingers on the top. Using quick hands, roll it up and away from you as if you were rolling a snowball, or a cinnamon roll. Lastly I placed the dough seam side up, with the seam running vertically, and did a fold that has a name that I can’t remember so I will instead describe it. I help both hands flat, palm side up, and put each hand under the dough so the dough was covering the inner 3/4 of each hand. Then I lifted the dough entirely off my surface and folded the two halves together, folding the dough like a taco, and pressing the two sides together lightly, especially at the “top” where the two sides came together.
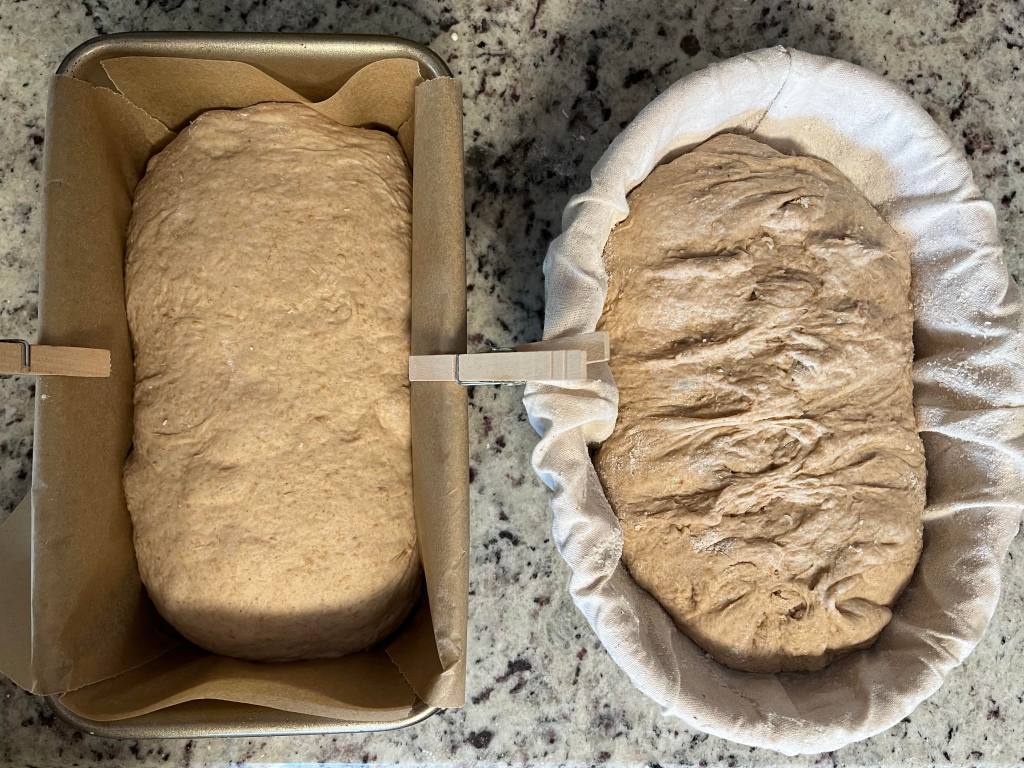
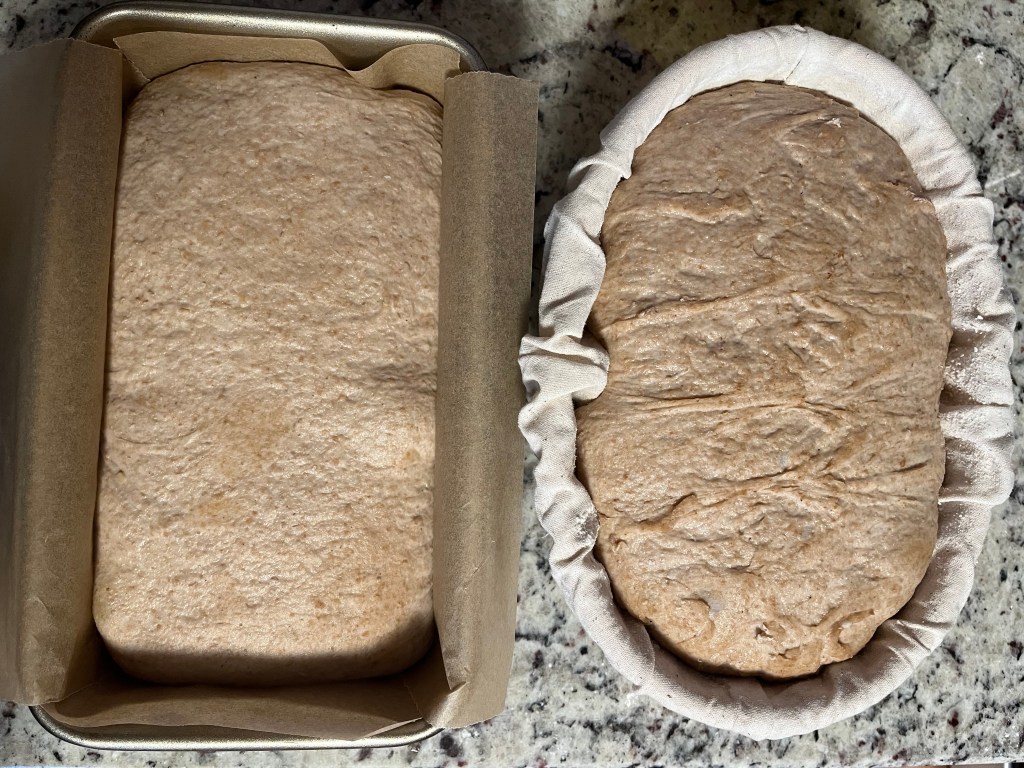
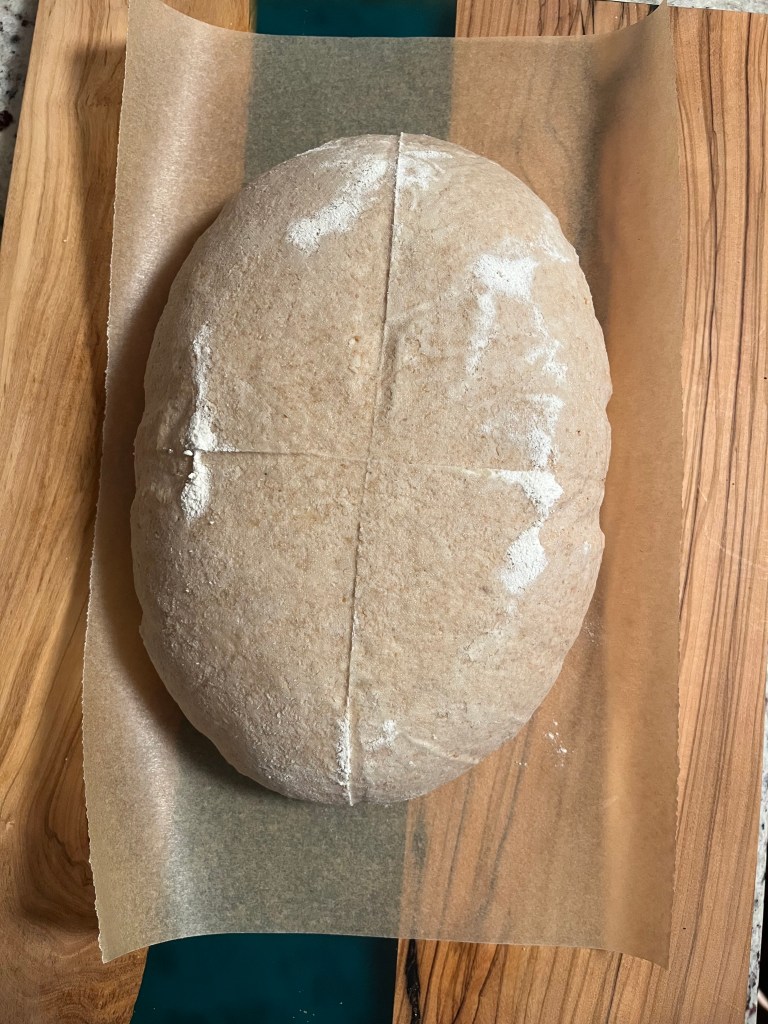
I made two loaves, one in a bread pan and one in a banneton. I places the one in the pan seam side down, and the one in the banneton seam side up, because I knew I was going to flip it before baking. The banneton loaf looked a little loose, so once it was in the basket I pulled together the sides together along the long side of the dough, like I was giving it stitched (but the stitches were just me pressing the dough together and it sticking to itself).
These loaves proofed for about 5 hours at cool room temperature (68F) and then an additional 3 hours in the fridge. I wanted to bake them after 5 hours, but they were clearly under proofed and I had an errand to run so I stuck them in the fridge. It actually worked out great, because I got perfectly proofed dough and it was also easier to score because the dough was stiffer from being in the fridge.
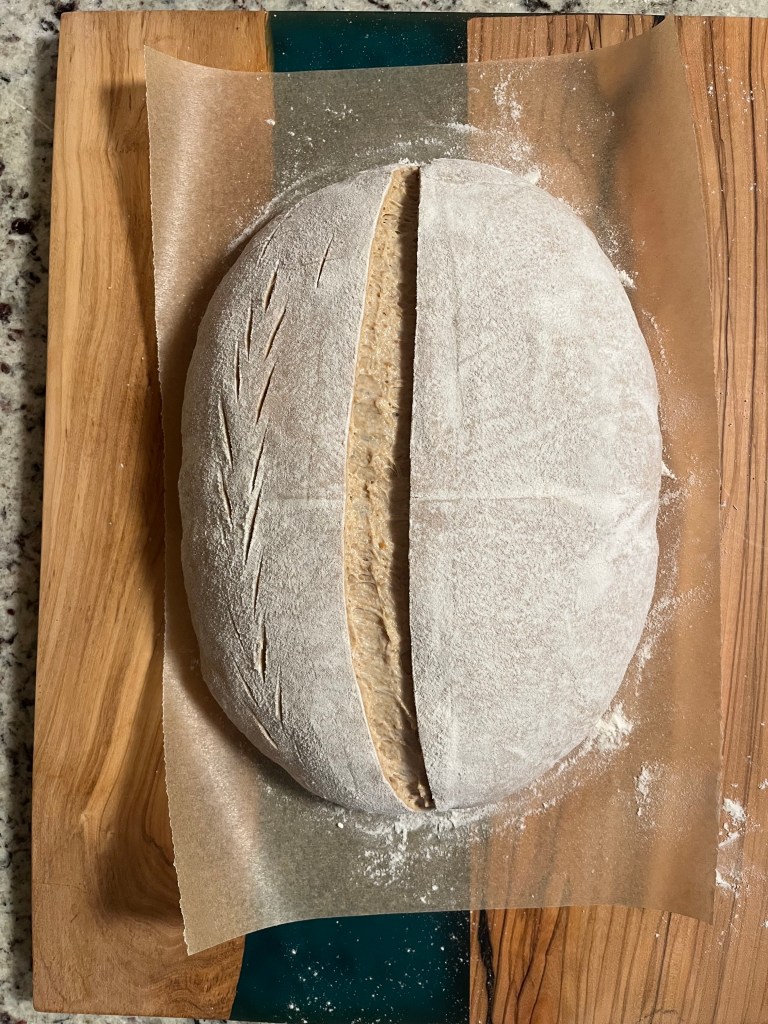
I started by preheating the oven to 450F about 30 mins before I wanted to bake, with my steam setup inside. For me this is a tall sided cast iron pan filled with rolled cotton kitchen towels and water, and another skillet style cast iron pan dry and fill with lava rocks. When the oven is preheated and I’m ready to bake, I took the loaves out of the fridge, gently flipped the one in the basket onto some parchment paper, and gave it a score. I gently scored the one in the baking pan too. I also put some water to boil in the kettle. When the water was boiling I transferred both doughs to the oven, poured the boiling water into my pan filled with lava rocks, and closed the oven door.
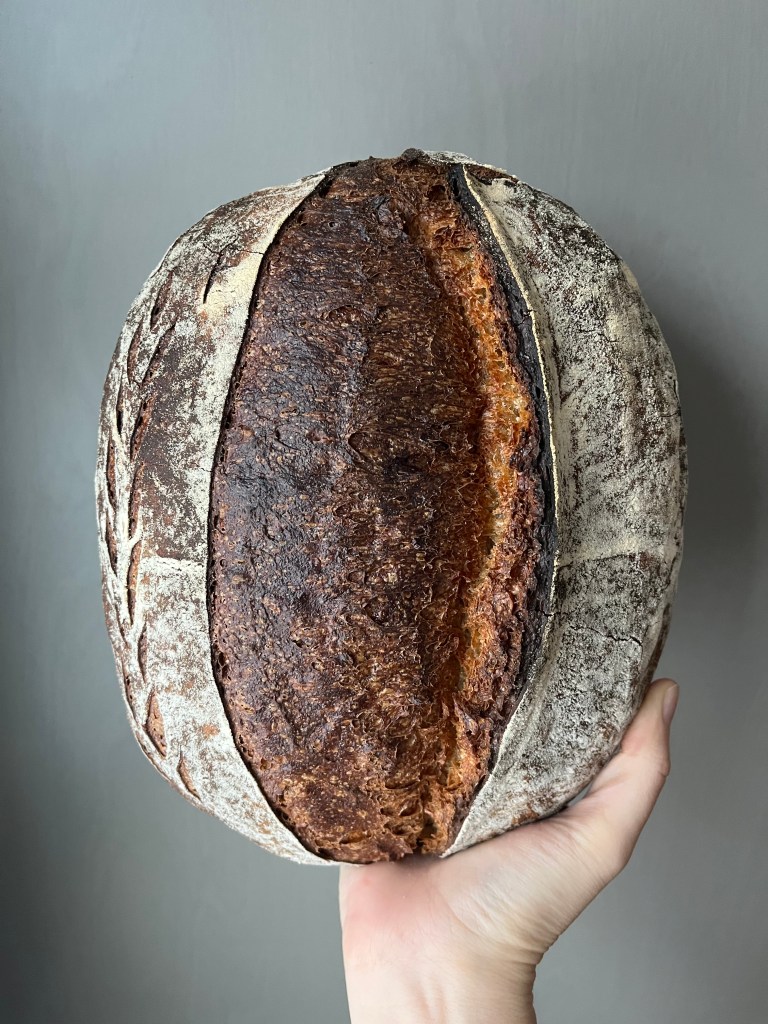
I removed by steam setup after 30 minutes to allow the crust to set. This is the first time you really get to see how your dough will turn out, so it’s very exciting. I was THRILLED to see a beautiful pale ear forming on my free loaf, indicating significant expansion. I let it bake for another 20 minutes and then took them out of the oven and onto a cooling rack. After a few minutes I removed the loaf from the baking pan so that condensation between the pan and the dough wouldn’t make the bread gummy.
100% Whole Grain Sourdough Recipe
Ingredients
| Levain/Starter | 20g sourdough starter 200g warm water 100g whole wheat flour 100g white flour |
| Autolyse | 500g whole wheat flour 350g spelt flour 630g warm water |
| Final dough | All of autolyse 300g levain 25g kosher salt 58g water |
Instructions
Day 1
| Approx. Time | Instructions |
| 8am | Mix the levain using the sourdough starter, water, whole wheat flour, and white flour in the levain recipe, stirring until well combined. Cover and let rest at room temperature for 8–12 hours, depending on the temperature of your kitchen. Mine kitchen was around 66F and the levain took about 12 hours to fully mature. |
| 7:30pm | Mix the whole wheat flour, spelt four, and water for the autolyse. Combine until you don’t see any dry flour remaining in your container. The dough will be quite thick at this point so it make take a little muscle to incorporate all of the flour. Cover and let rest. |
| 8pm | Add 300g levain, the salt, and 58g warm water to your autolyse mixture. Fold in the salt and levain as much as possible, then use your thumb and forefinger to pinch of balls between the size of a golf ball and a baseball. When this is done, fold around the bowl again. Continue to pinch and fold until you no longer feel grains of salt between your fingers. Form the dough back into a ball, then cover and let rest. |
| 8-10pm | Fold the dough 4 times before you go to sleep for the night. Do this by stretching the far side of the dough up and over to the edge closest to you. Then turn the container 90˚ and repeat for the other three “sides”. On the last fold it might be easier to do a coil fold. Let the dough rest covered at room temperature for 12 hours or overnight. |
Day 2
| Approx. Time | Instructions |
| 8am | Prepare two proofing baskets with a liner, or use a small mixing bowl covered with a kitchen towel, pushing the towel into the bowl to contact the inside. Coat the towel with flour where it sits over the opening of the bowl. Alternatively you could use a bread pan covered with parchment paper, if you want your bread to have a more sandwich friendly shape. Gently coax your dough out of the container onto a lightly floured surface. It should be quite puffy at this stage. |
| 8:05am | Shape the dough by folding it like an envelope. Start by pulling the top towards you, then pull the right side up and over to the left and the left side up and over to the right. Lastly, pull the bottom of the dough over everything else towards the top. Now your bread is lightly shaped. Next, grab the left side of the dough with your left hand and the right side of the dough with your right hand. To make a tight log grab the bottom of your dough with both hands and roll it up towards the top like a sleeping bag. Pinch the seams together where needed. If the dough still seems loose, lifted the dough entirely off my surface with two flat hands next to each other and fold the dough like a taco, pressing the two sides together lightly, especially at the “top” where the two sides come together. |
| 8:10am | Transfer the shaped dough to the proofing basket or flour-coated bowl seam-side up. If using a bread pan place the dough seam side down. Cover with another kitchen towel and let rest at room temperature for around 5 hours. |
| 1pm | Transfer both covered loaves to the refrigerator to finish proofing. |
| 3:30pm | Preheating the oven to 450F, with your baking surface and steam setup inside. For me this is a tall sided cast iron pan filled with rolled cotton kitchen towels and water, and another skillet style cast iron pan dry and fill with lava rocks. Alternatively you could use a vessel with a lid like a dutch oven. |
| 4pm | Take the loaves out of the fridge, gently flip any in a proofing basket onto some parchment paper, and gave them a score. I like to do an angled score right down the middle and some decorative scoring on one side. If using a bread pan don’t flip the dough, but you can gently try to score it if you want. If you’re open baking put some water to boil in a kettle or on the stove. When the water boils, transfer both doughs to the oven, pour the boiling water into the pan filled with lava rocks (or an empty pan), and close the oven door. Bake covered for 30 mins. |
| 4:30pm | Take the steam setup out of the oven, or remove the lid of your vessel, and continue to bake for another 20 mins. |
| 5pm | Remove your bread from the oven and transfer it immediately to a drying rack using a spatula, towel, or whatever you have available. Let cool completely before slicing. |